The Ultimate Guide to DIY Immunity Shots (and the Secret to Freezing Them for Smoothie Perfection!)

Whip up powerful immunity-boosting wellness shots with ease! Featuring fiery ginger, vibrant turmeric, zesty citrus, and a touch of honey, this simple recipe helps strengthen your defenses. Blend a batch to enjoy as a daily shot or freeze into cubes for an effortless, health-packed smoothie boost!
Pouring Immunity Shot Liquid into a Smootheeze Tray.

We’ve all been there. You sense a little tickle in your throat. You’re a little run-down. You can’t shake the feeling that something is creeping up on you? 

Yep. You remember your coworker was sick or that cold is working its way through your family, and you know you’re next. 

That’s where the trusty immune-boosting wellness shot comes in! It’s your body’s tiny, spicy, superhero sidekick that stops the sniffles in its tracks and gives you a lasting jolt of energy.

But buying those little bottles can add up fast—they’re crazy expensive and it’s so much plastic waste. I looked at the ingredients and figured it’s pretty simple to make yourself. 

After a bit of experimenting, I came up with a great recipe that’s perfect for smoothies or drinking straight. So, let’s learn together how to make immunity shots better (and way cheaper!) at home.

Fresh ingredients like lemons, ginger, and honey on the counter for making the Smootheeze Immunity Shot

What Is an Immunity Shot and How Do I Make One at Home?

An immunity-boosting wellness shot is a concentrated, potent dose of healthful ingredients—like ginger, turmeric, and lemon—designed to deliver anti-inflammatory and antioxidant benefits to your system quickly. 

You can easily make them at home by blending just a few potent ingredients, straining the liquid to remove the pulp, and refrigerating or freezing the liquid for a quick, daily health ritual. 

They’re a simple, proactive way to support your natural immune defenses, and they take less time to make than brewing a pot of coffee! Plus, your pocketbook will thank you, and you won’t have to worry about wasting so many plastic bottles.

Our Secret Weapon Recipe: The Sunrise Immunity Shot

This shot isn’t just about protection from colds; it’s about a delightful, spicy kick that actually makes you feel alive

The beauty of this recipe is its simplicity—just a handful of powerhouse ingredients. Plus, we’re giving you two ways to prep: 

  • The ultra-easy smoothie shot, perfect for adding to your morning blend (skip the peeling, drop everything straight into a blender, and enjoy all the pulpy goodness for extra fiber)
  • Or the drinkable wellness shot (peel, blend, and strain for a clean drinking experience).


Either way, it’s destined to be your favorite health ritual to start your day!

Ingredients You’ll Need

Use the following ingredients and quantities as a starting point, then adjust as needed to suit your tastes. If you hate the taste of turmeric, leave it out or start with a smaller amount to get used to it. If it’s overall too spicy, add extra liquid or cut the amount of ginger in half.

Fresh Ginger

We’re not playing around here—ginger is the star and you need a lot to give this blend its spicy kick!

  • Quantity: 4-6 extra-large pieces or about 1 cup when roughly chopped.
  • Health Benefits: Ginger has natural anti-inflammatory powers, soothes the gut, helps regulate blood sugar levels, and provides an antibacterial and antiviral boost.
  • Preparation: No need to peel if taking the ultra-easy route! Just scrub clean and pop in the blender. Alternatively, scrape off the skin with a knife or spoon to make a less pulpy mixture.

This sunny spice is where all the golden color comes from. (Optional if you don’t like the taste)

  • Quantity: 3-4 two-inch pieces or 2 tbsp turmeric powder.
  • Health Benefits: Contains curcumin, a powerful antioxidant known for its full-body anti-inflammatory effects.
  • Preparation: (Handle with care—this stuff stains everything!): Again, the choice is yours to clean and add directly to the blender or peel them first. If peeling, it’s recommended to wear gloves and do it over paper towels to prevent staining on your fingers and counter/cutting board. If using powder, simply measure and add to the blender.
  • Pro tip: If you decide to include turmeric, add 1 tablespoon of coconut or avocado oil to help your body absorb it and reap the full benefits.

The foundational citrus that provides a bright, tangy flavor.

  • Quantity: Six large lemons.
  • Health Benefits: High in Vitamin C for robust immune defense and supports liver function. Including the peels helps you get the most nutritional benefits from all of the citrus oils, compounds, and maximum fiber.
  • Preparation: You have a few options for prepping all of the citrus ingredients:
    • Cut in half and include the peel for the ultra-easy, high-fiber route.
    • Peel and toss in the blender for a bit of pulp.

For that zesty flavor and extra vibrant lift that contributes to overall detoxification!

  • Quantity: Four fresh limes.
  • Health Benefits: Packed with vitamin C and antioxidants for increased immune defense and heart health, citric acid to help prevent kidney stones, and boosts alkalinity to fight free radicals.
  • Preparation: Include the whole fruit for the no-fuss method or peel.

We need a little sweetness to balance the spice!

  • Quantity: One large Navel or Valencia orange.
  • Health Benefits: Extra Vitamin C for immune health and aids in collagen production for healthy skin.
  • Preparation: It’s recommended to remove the orange peels; otherwise, the mixture is a bit too thick and pulpy. It really comes down to personal preference. Try it once with all of the citrus peels and then try it without to see which you prefer best.

The transport vehicle for all our super-spices. You can simply use filtered water if you prefer or don’t have coconut water on hand.

  • Quantity: One cup.
  • Health Benefits: Provides essential electrolytes for proper hydration.
  • Preparation: Pour into the blender to help everything mix well. Add more as needed to reduce the intensity of flavor.

Nature’s sweetest healer. The honey helps balance the flavors, so feel free to add a little extra if the mixture is too spicy.

  • Quantity: 2 tablespoons.
  • Health Benefits: Provides natural antibacterial and soothing properties. Manuka honey is preferred for extra antioxidant oomph!

Don’t skip this one! It’s the secret ingredient that makes the turmeric work.

  • Quantity: 1-2 tablespoons ground pepper.
  • Health Benefits: Contains piperine, which increases your body’s ability to absorb the benefits of turmeric (curcumin) by up to 2,000%.

For the truly brave, it adds a spicy kick to wake up your sinuses.

  • Quantity (optional): 1-2 teaspoons cayenne powder.
  • Health Benefits: Can boost metabolism, circulation, and give you that instant fiery cleanse feeling.
  • Preparation: Start with 1 tsp and adjust up or down after blending.

Simple Steps to Blend Your Bulk Batch of Immunity Shots

Blending the Sunrise Smoothie Immunity Shot
Pouring immunity shot liquid into a small bottle
  1. Prep: Decide which type of immunity shot you’d like to make.
    • For the easy prep, high-fiber smoothie shot option, don’t peel any ingredients. Simply rinse and give everything a rough chop, and then place all ingredients into a 48-64 oz blender. If you have a smaller blender, you can cut the recipe in half or blend everything in two batches.
    • To make immunity shots to drink on their own, peel the citrus and place everything in the blender, or consider juicing them first to make it easier to strain the mixture.
  2. Blend: Secure the lid and blend on high for 2-3 minutes, until the mixture is completely smooth and liquified.
  3. Strain: This is key for a smooth, drinkable wellness shot. Pour the mixture through a fine-mesh sieve or cheesecloth into a clean bowl with a pour spout or large liquid measuring cup. Press down hard to squeeze out every last drop of that liquid gold! To put a touch of fiber back into the mix, add 1-2 tbsp of the leftover pulp and stir well. 
    • Store: Pour the strained liquid into small, airtight shot bottles (about 2-ounce servings) or a single mason jar. Makes about 16 shots or 2 cups.
    • Enjoy: Pop one back first thing in the morning! They will last about 1 week in the refrigerator. You can also freeze in silicone ice trays to pop in some warm water in the morning, or put a couple in a glass and let them thaw overnight in the fridge.
  4. For the time-saving, high-fiber, no-hassle smoothie shot method, continue reading.

Pro Tip: Freeze Immunity Shots for Smoothies

Frozen cube of the Smootheeze Immunity Shot Recipe

Okay, here’s the real genius move—the reason why batch-prepping these shots is a game-changer. While they last about a week in the fridge, we want pure, effortless nutrition, right?

Instead of taking these powerful little guys straight, freeze them into Smootheeze silicone freezer trays! This turns a spicy morning shot into a perfectly portioned, nutrient-dense booster for your daily smoothie. You get all the immune-boosting benefits, plus a healthy dose of fiber, creating a smoothie with a good balance of macronutrients.

How to Make Your Frozen Smootheeze Shots:

  1. Prep and blend: Follow the no peel preparation and blending instructions, but skip the straining step.
  2. Freeze: Pour the mixture evenly into a Smootheeze half-cup freezer tray or other silicone ice molds to save for your daily smoothie. The recipe makes about 4 cups.
  3. Blend: When you’re making your morning smoothie, simply drop one half-cup cube into the blender along with your favorite smoothie recipe using frozen fruit, greens, and liquid.
 
Pro Tip: Pour the blended shots over your favorite ingredients in a Smootheeze tray for a super fast and easy way to blend up immunity smoothies. Please be aware that turmeric can stain the lids of Smootheeze trays. Avoid overfilling so that the mixture does not come in contact with the lid. Don’t worry if staining occurs; it will fade and eventually wash away with repeated cleaning. 
Pouring Immunity Shot Liquid into a Smootheeze Tray.

Want a run-down on everything that goes into making the perfect smoothie?

Check out our Ultimate Guide to Making Smoothies!

Frequently Asked Questions about Wellness Immunity Shots

How often should I drink immunity shots?

Most people enjoy these shots daily, usually first thing in the morning on an empty stomach to kickstart digestion and absorption. Think of it as your consistent, daily vitamin C and anti-inflammatory ritual.

How long do my fresh shots last in the fridge?

When stored in an airtight container, homemade shots are best consumed within 5 to 7 days. If you freeze them using Smootheeze, they’ll happily last for up to 3 months!

Can I change the recipe?

Absolutely! This recipe is spicy and zesty, but if you want to soften the edges, feel free to add an apple or a handful of grapes before blending. You can also replace the coconut water with pineapple, apple, or orange juice for a sweeter drink. Just keep the ginger and lemon as the star players!

What if I don't like turmeric, is it necessary?

Feel free to skip the turmeric altogether if you don’t like the taste or don’t want to deal with the staining. If you put the turmeric mixture in a Smootheeze silicone container, it may stain the lid slightly. It will fade over time and eventually wash out.

Ready to simplify your wellness routine and make every smoothie count?

Give our DIY immunity shot recipe a try and check out how Smootheeze turns making smoothies and meal prepping into a hassle-free dream.

Happy blending!

Pouring Immunity Shot Liquid into a Smootheeze Tray.

DIY Immunity Wellness Shots

Whip up powerful immunity-boosting wellness shots with ease! Featuring fiery ginger, vibrant turmeric, zesty citrus, and a touch of honey, this simple recipe helps strengthen your defenses. Blend a batch to enjoy as a daily shot or freeze into cubes for an effortless, health-packed smoothie boost!
Print Pin Rate
Course: Drinks
Prep Time: 10 minutes
Cook Time: 5 minutes
Total Time: 15 minutes
Servings: 4 Cups

Equipment

  • 1 Blender
  • 1 Strainer or cheesecloth
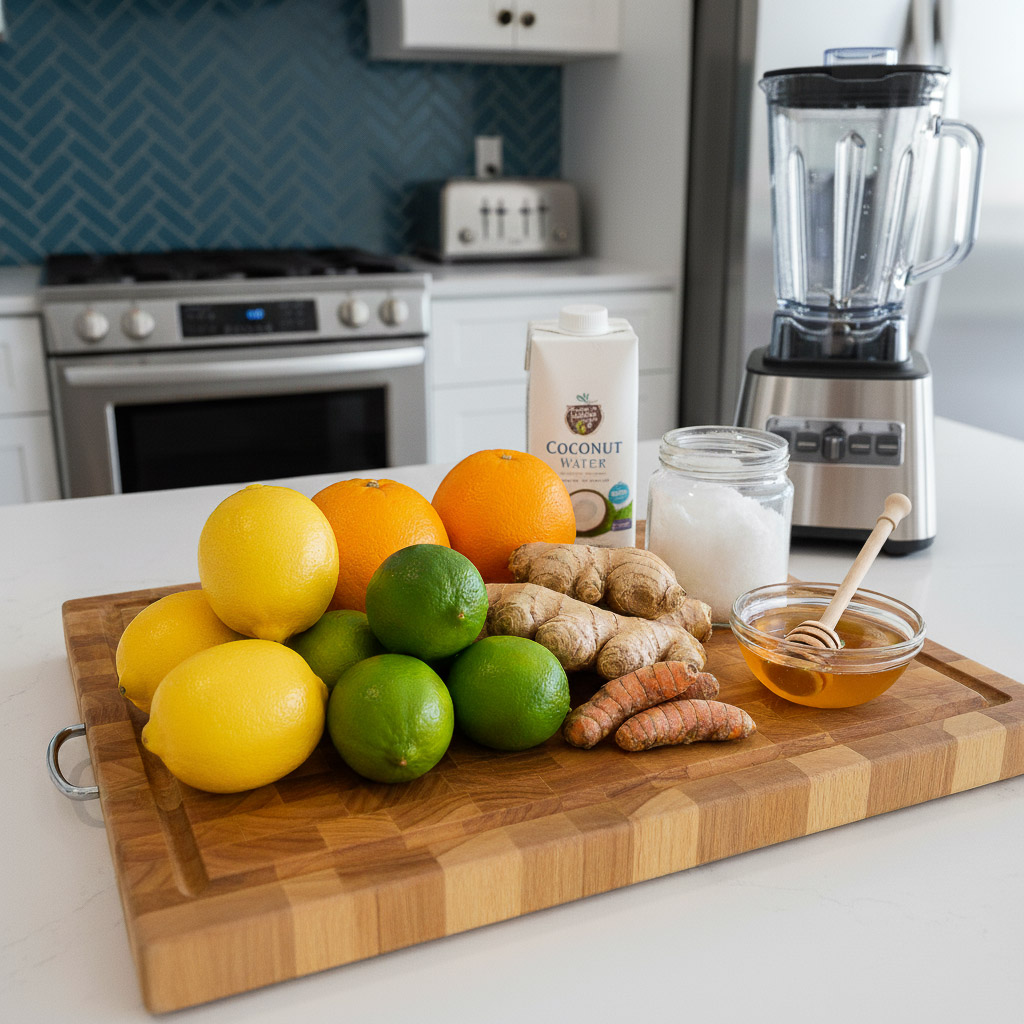
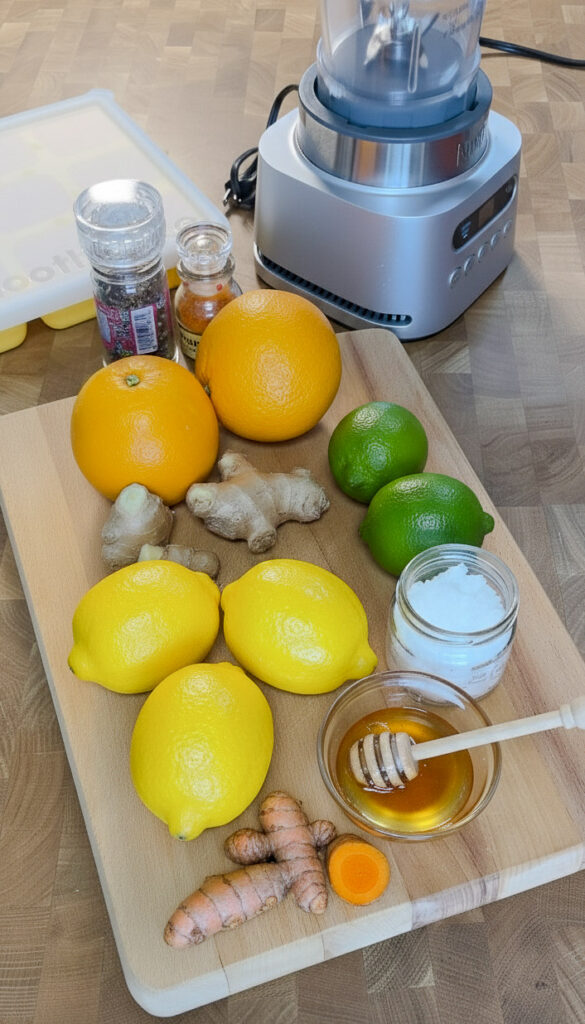
Ingredients

  • 4-6 Large pieces Fresh Ginger about 1 cup when roughly chopped
  • 3-4 2 inch pieces Turmeric Root Optional
  • 6 Large Lemons
  • 4 Regular Limes
  • 1 Large Orange
  • 1 Cup Coconut Water
  • 2 Tbsp Honey Manuka or raw honey if possible
  • 1-2 Tbsp Ground Pepper
  • 1-2 Tsp Ground Cayenne Pepper

Instructions

  • Wash and prepare ingredients for blending.
  • Add 1 cup of coconut water to a 48-64 oz. blender.
    1 Cup Coconut Water
  • Roughly chop the ginger and turmeric and add to the blender.
    4-6 Large pieces Fresh Ginger, 3-4 2 inch pieces Turmeric Root
  • Cut the lemons, limes, and orange in half or into quarters, then add to the blender.
    6 Large Lemons, 4 Regular Limes, 1 Large Orange
  • If you plan to make a pulp-free wellness shot, remove all of the citrus peels first to make it easier to strain.
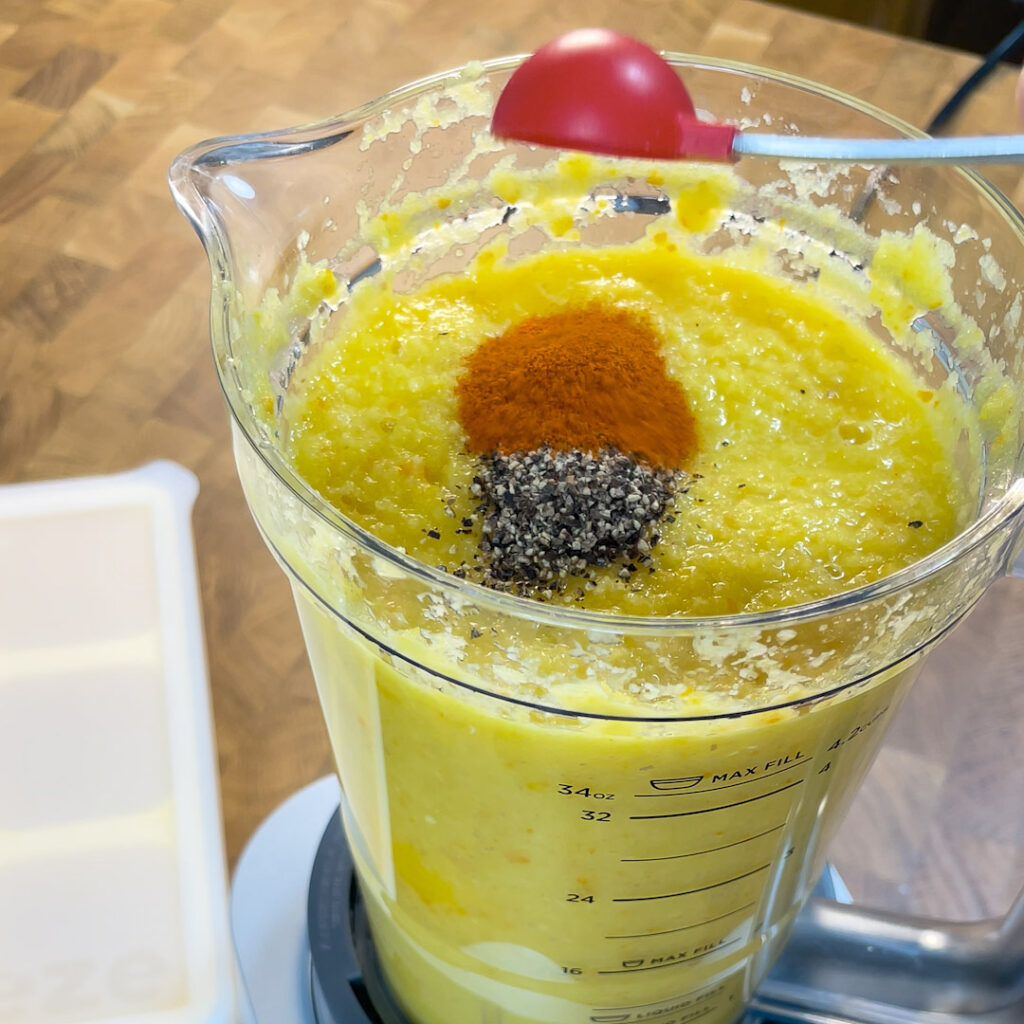
  • Add the honey, ground pepper, and cayenne to the blender.
    2 Tbsp Honey, 1-2 Tbsp Ground Pepper, 1-2 Tsp Ground Cayenne Pepper
  • Secure the lid and blend on high for 3-4 minutes until smooth.
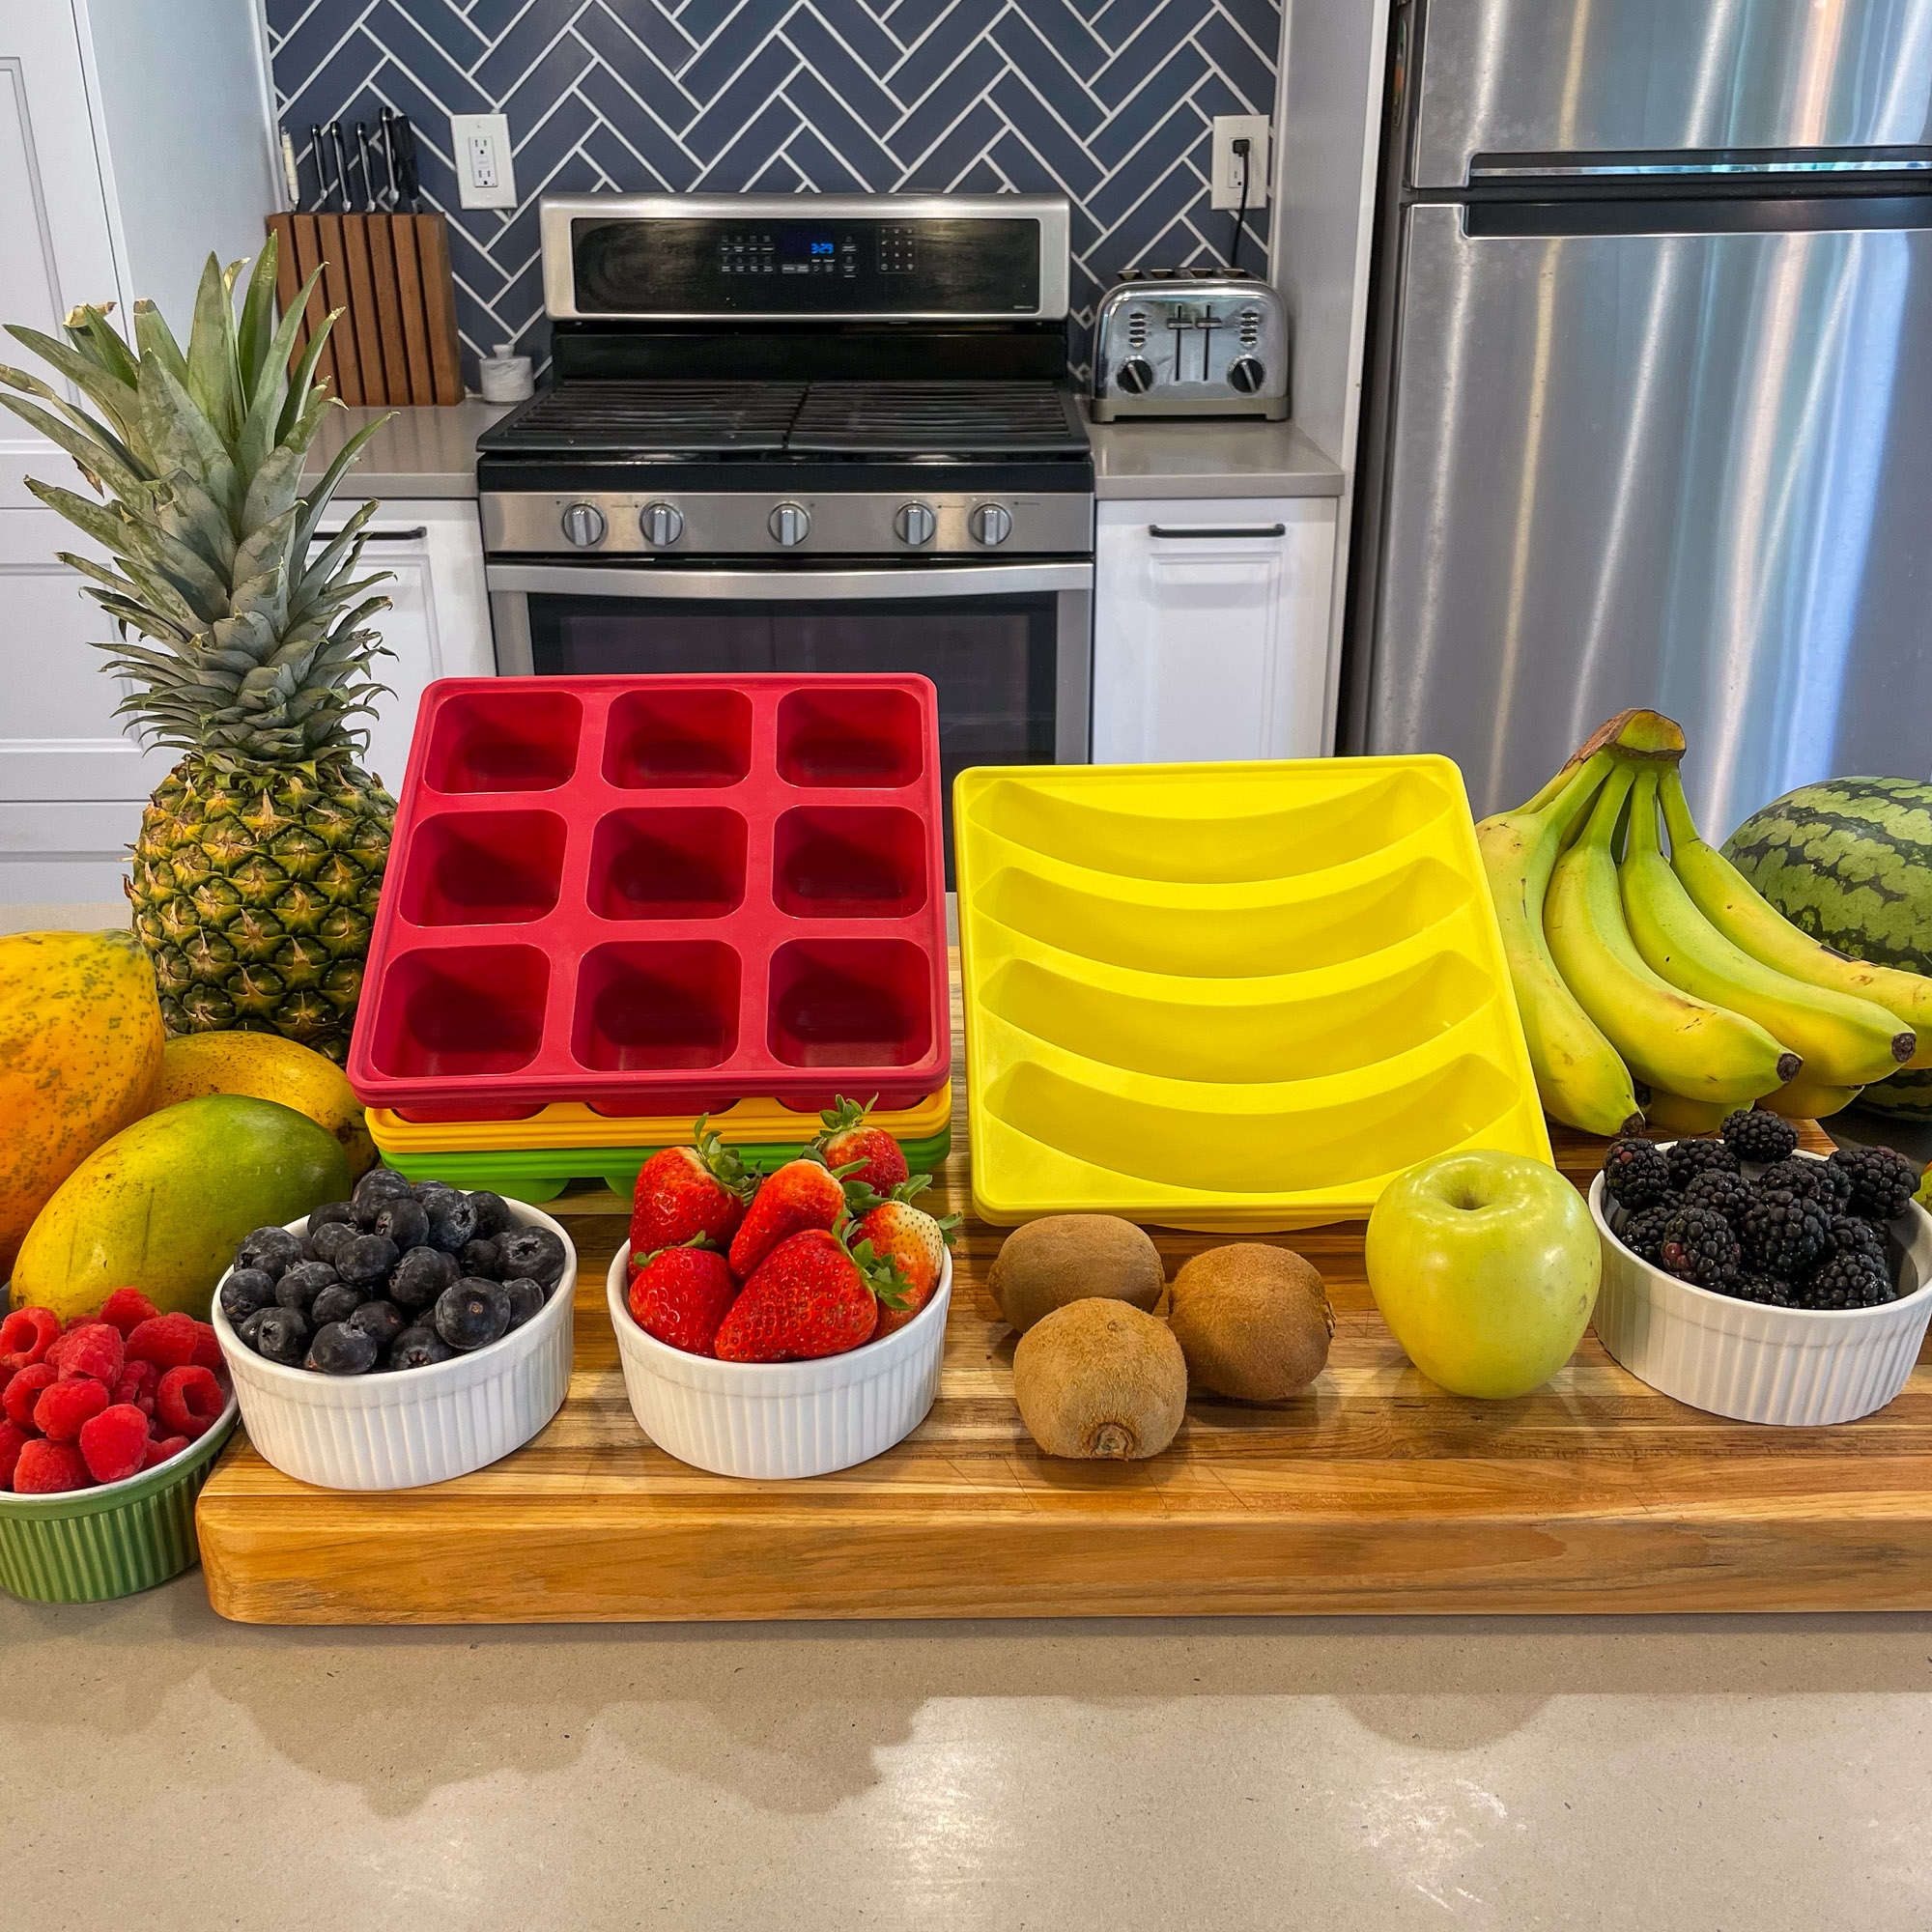
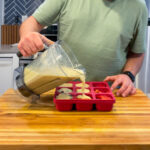
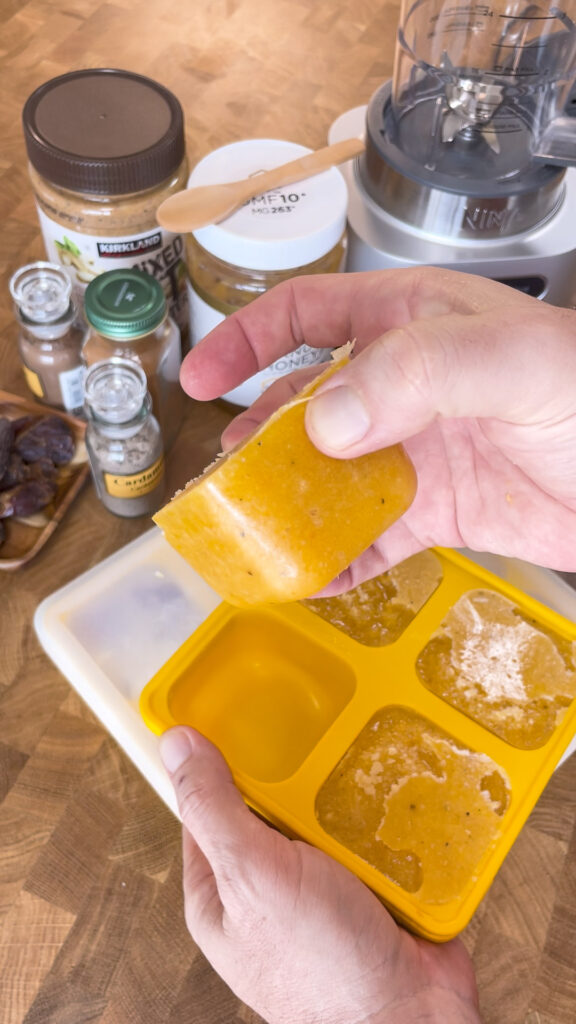
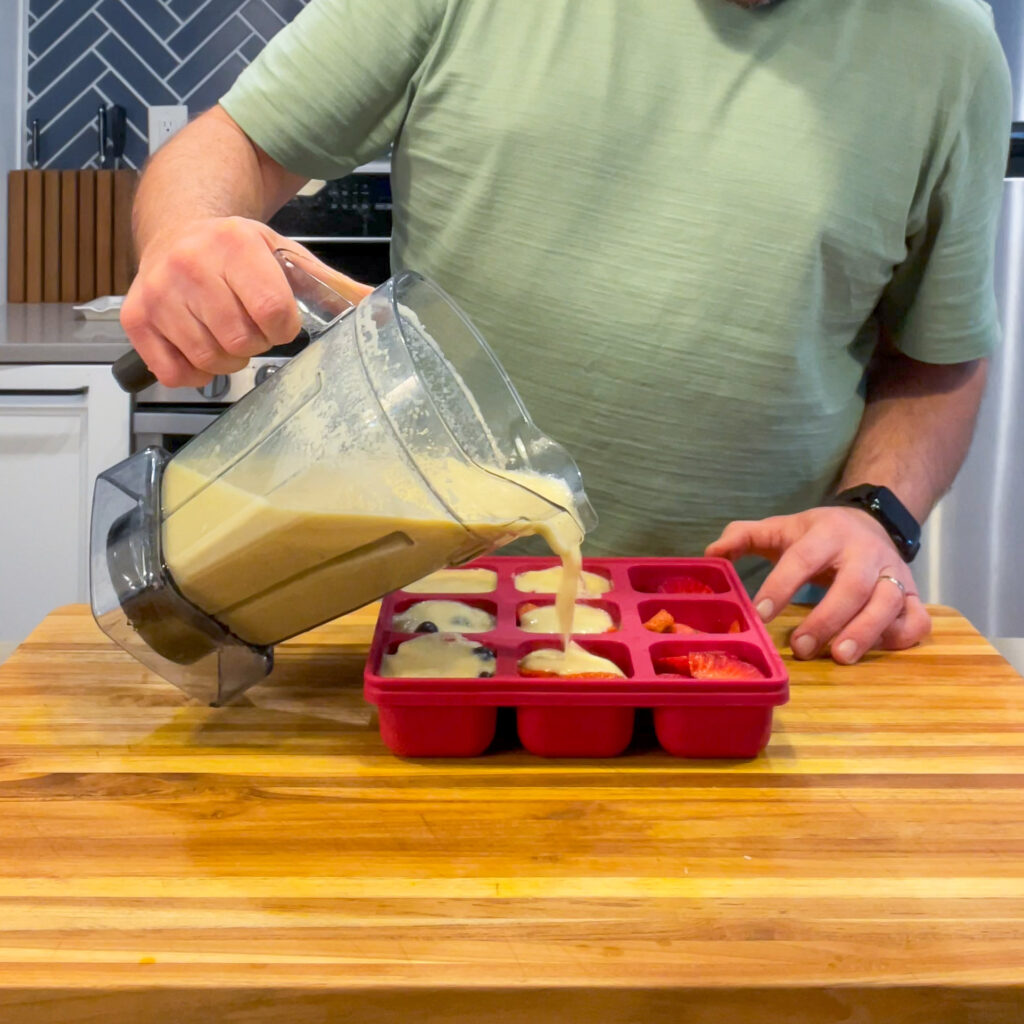
  • To frozen Smoothie Wellness Shots, pour the mixture evenly into a Smootheeze Freezer Tray or other half-cup silicone freezer containers. Don't fill all the way to the top to allow for expanding as it freezes. You will have about 9 half-cup portions.
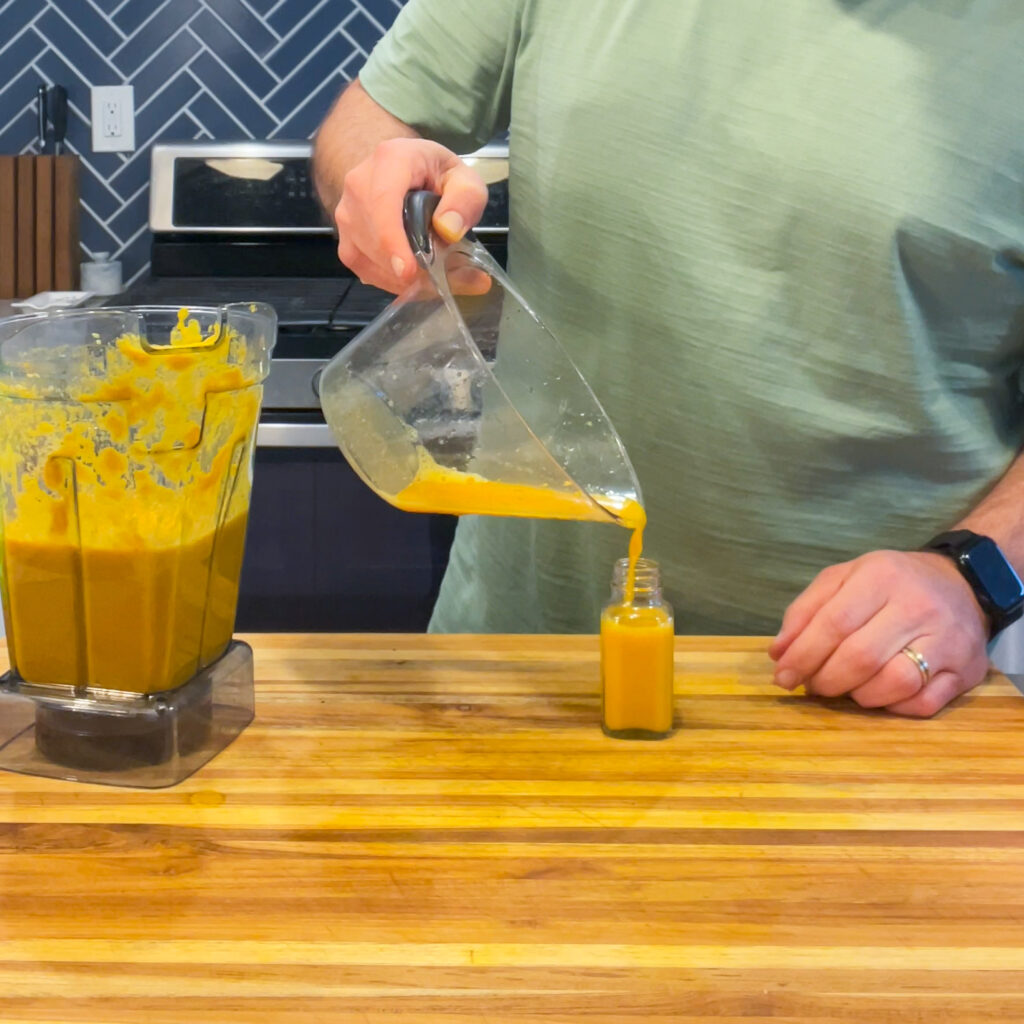
  • To make drinkable liquid wellness shots, pour the blended mixture through a fine mesh sieve or strain through a cheesecloth into a large bowl with a pour spout or a large liquid measuring cup. You should have about 2 cups.
  • Pour the strained liquid into 2-oz glass jars and store in the refrigerator for up to one week. You can also freeze the liquid in silicone ice trays for 3-4 months. Add 1 or 2 cubes to a cup with hot water to drink, or remove from the fridge and allow to thaw overnight in a glass to drink in the morning.

Nutrition

Serving: 1half cup

Ready to blend up some magic?

Check out The Ultimate Collection of Timeless Smoothie Recipes

and take your smoothie game to the next level!

Ready to Level Up Your Smoothie Game?

Image of Smootheeze freezer trays surround by fresh fruits and veggies for freezing.

⭐⭐⭐⭐⭐
Amazing! I love these. Perfect portion sizes and love not having to grab a bunch of different bags from the freezer. The banana tray is wonderful! I put the banana in and then cut in pieces so I can just grab a few pieces at a time. Thank you for these.

Say goodbye to the hassle and hello to perfectly portioned, ready-to-blend smoothie ingredients with Smootheeze silicone freezer trays.

Leave a Reply

Your email address will not be published. Required fields are marked *

Recipe Rating